The pack rat urge is so strong in me that when I redesigned and organized my studio several years ago, I decided I needed a place for all these things, so among the boxes neatly labeled things like "Acrylic Craft Paint", "Adhesives and Glue", and "Armature Wires and Tape", I have a box which bears this label; " I Can Use That For Something!"
I imagine that I am not the only artist with such a box, and I also imagine that we all have a similar box in our brains, because we compulsively collect something else as well--ideas and inspiration! We can't help it! Colors, textures, shapes, sounds, smells, movement, bits of songs and poetry--we stash all these things away, sometimes consciously, sometimes not, into that special "I Can Use That For Something" part of our brains. Then, periodically we rummage through our boxes, both the physical one and the metaphorical one, and a creation-- sometimes one many years in the making-- comes into being!
My piece for the "Funk and Junk Challenge Gallery" happened just like that. When I read the announcement of the challenge, I knew exactly what I wanted to do. I rummaged through my junk box and pulled out a broken wine bottle opener I had been saving for at least ten years. When the corkscrew part broke off, I told my husband not to throw it away because I was going to make something with it. I knew even then what I wanted to make because stashed in the I-Can-Use-That-for-Something part of my brain there was a memory of playing with my parents' wine bottle opener when I was a child. I loved the way it's "arms" moved up when you pressed down on it's "head". It reminded me of a Jumping Jack toy my baby brother had.
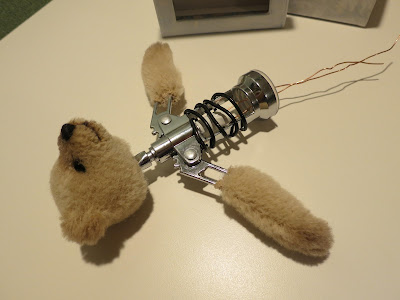
So now, many years after playing with a wine bottle opener, and many years after saving the broken one, I have made my Jumping Jack (in the Box) toy! In addition to the broken wine bottle opener, I used other junk from my stash: hanger wire, electrical wire, a recycled gift box, bits of pencil erasers, a bobbin from a sewing machine I no longer own, and mohair and fabric scraps and trims left over from other projects. He is a combination of two classic toys, a Jack in the Box and a Jumping Jack. When the handle is turned his head and arms go up and down.
I am nearly finished. I have to attach the bottom of his box and I will be adding a bit more air brush shading to his face and hands, but I thought you might enjoy some work in progress photos:
Click on any photo to see it larger.
 |
| I didn't end up using the old sweater and the cork... |
 |
| This shows the basic idea for the movement. |
 |
| Wire wrapped around the middle shaft and taped in place. |
 |
| Head and arms added. the wire is to keep the batting (added later) out of the inner workings. |
 |
| The trimmings! |
 |
| Working on the movement involved a LOT of trial and error! |
 |
| A hole in the bottom allowed me to make adjustments. |
 |
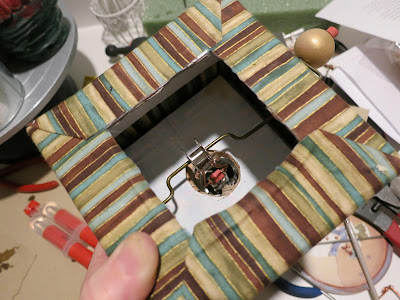
| Nearly there! Trim pinned while the glue dries. |
 |
| The square to the left will be the bottom cover. |

13 comments:
OMG I just said I wanted to make a jack in the box one day. This is fab and we own the brewery too so love your opener idea. LOVE LOVE LOVE. would love to adopt this one.
Thank you Michele! I had such fun with this! Jack will be avaiable at the Quinlan Show, but if he comes home with me I'll let you know. Thanks again!
That is awesome Tammi. Can't wait to see it. I am coming to the show.
Tami you need to get a video going of this little bear in action! Did you design this mechanism yourself... my hubby and I are just so impressed by this! Awesome!
Yes I will get a video soon. The show is coming up fast and I have SOOOO many things in progress right now, byt I hope t post one soon. I did design the mechanism myself and it was not without frustration, but I like to solve problems.I had a pretty good idea what I was going to do, but had to make a number of changes as I played with it. At first, I had the wires coming straight down from the moving part of the opener and attaching to the winding rod. But they twisted up and broke! That was the most frustrating part because, I had already glued the opener to the box lid with two part epoxy and I had no diea how I would fix the problem without being able to take it off. I tried string, but the range of motion was much less and he just looked like he had a bad twitch! He looked finished at that point, but I set it aside for two weeks and worked on the problem in my head while finishing other things. I realized there needed to be TWO pivot points around TWO axes, one at the top near the center rod and another around the winding rod. (You can see this in photo 6)By the time I was ready to have another go, I had a clear picture in my head of how to do it. I added the bobbin at the last moment though because I needed just a little bit more felxibility. I was searching around my studio for two tiny somethings with a hole at each end. The bobbin was not what I had pictured, but I think it worked better in the end. Fun stuff!
How C O O L is that?!!! Well done, Tami!!
Hugs,
Cheryl
Tami! What an awesome design! Very cool idea and a great embodiment! Yum! Bear wonderful))
Awesome!!
Oh he's fabulous, love him! Now I know why I just needed to get my loft floored so I had more efficient junk storage *ahem*
Oh my gosh,this is amazing. What an incredible imagination you have to come up with this. I am so glad I get to see it in person.
Oh Tami what a wonderful job you did making this jack in the box. You are truly amazing.
Hugs Tracey
Bears by Tracey
New Zealand
Tami - your creativity mixed with beautiful bear expressions is fabulous - love your art!! Have a wonderful time at the Show!!!
Oh!! Wonderful! I just love this little guy! I hope you had a wonderful show. :o)
Post a Comment